
Rigid-Flex PCB: A Complete Guide to Design Rules, Bend Radius & Cost
Rigid-flex PCB design rules with real numbers: 6:1 static and 100:1 dynamic bend ratios, IPC-2223 transition clearance, RA vs ED copper, and the 3-5x cost premium.
Get Your PCB Quote!
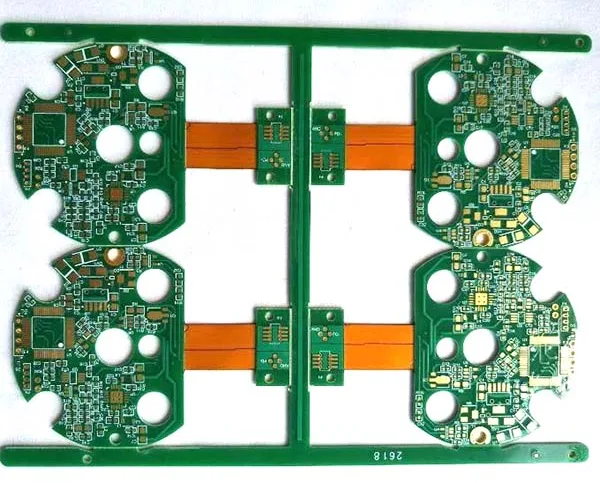
Table of Contents
- What is a rigid-flex PCB?
- When is a rigid-flex PCB actually worth it?
- Bend radius rules: the numbers that prevent conductor cracking
- Design rules for the rigid-flex transition zone
- Materials: RA vs ED copper, polyimide vs LCP, coverlay vs solder mask
- IPC-6013E classes: what Class 1/2/3 actually change
- Fabrication process: why rigid-flex takes multiple lamination cycles
- Rigid-flex cost: the 3-5x premium and when it pays back
- Common rigid-flex failure modes
- Rigid-flex applications: where the technology is already standard
- How to choose a rigid-flex PCB manufacturer
- Frequently Asked Questions
- Conclusion
Table of Contents
- What is a rigid-flex PCB?
- When is a rigid-flex PCB actually worth it?
- Bend radius rules: the numbers that prevent conductor cracking
- Design rules for the rigid-flex transition zone
- Materials: RA vs ED copper, polyimide vs LCP, coverlay vs solder mask
- IPC-6013E classes: what Class 1/2/3 actually change
- Fabrication process: why rigid-flex takes multiple lamination cycles
- Rigid-flex cost: the 3-5x premium and when it pays back
- Common rigid-flex failure modes
- Rigid-flex applications: where the technology is already standard
- How to choose a rigid-flex PCB manufacturer
- Frequently Asked Questions
- Conclusion
Quick Specs
| Typical layer counts | 2-16 layers total; rigid zones 4-12 layers, flex zones 1-2 layers common |
| Flex dielectrics | Polyimide (standard), LCP (high-frequency), PET (cost-sensitive) |
| Copper foils | Rolled annealed (RA) for dynamic flexing; electrodeposited (ED) for static |
| Bend radius rules | Static 6:1-12:1; dynamic guidance varies by source (10:1 up to 100:1-150:1) |
| Governing standards | IPC-6013E (qualification/performance), IPC-2223E (design) |
| Cost premium vs rigid | Roughly 3-5x for equivalent area; simple designs from 2x, high-reliability up to 8x (directional) |
| Typical lead time | 1-3 weeks longer than a comparable rigid board |
A rigid-flex PCB is a single laminated board with rigid FR-4 zones for component mounting and thin polyimide flex zones that bend, fold, or curve—replacing the cables and board-to-board connectors a conventional rigid design needs between sections. It is worth the 3-5x cost premium (directional industry estimate) when your product has a tight 3D enclosure, a dynamic flexing requirement, or a vibration environment where connectors are the weakest link; it is not worth it when a static flex PCB or a standard rigid board with one connector would do the job. This guide covers the design rules with real numbers, the materials that determine bend life, and the cost decisions that separate a good rigid-flex project from an expensive respin.
Key Takeaways
- Published bend-radius guidance genuinely disagrees: static rules cluster at 6:1-12:1, but dynamic guidance ranges from roughly 10:1 (common fabricator rule) to 100:1-150:1—confirm the number your fabricator actually designs to.
- Vias and plated through-holes must stay roughly 1.0-1.5mm clear of the rigid-flex transition line (per IPC-2223-family design guidance), not 0.5mm—the most common DFM catch on rigid-flex orders.
- Rolled annealed (RA) copper delivers roughly 20-30% elongation before fracture vs. 5-10% for electrodeposited (ED) copper (vendor-published ranges), which is why dynamic flex zones must specify RA.
- Rigid-flex costs about 3-5x a comparable rigid board (2x simple, up to 8x high-reliability), and the premium only pays back when the design actually removes connectors, assembly steps, or enclosure volume.
- IPC-6013E Class 3 is not “Class 2 with better luck”—it changes bend-cycle testing, copper plating requirements, and documentation, and you must specify it in writing before quoting.
What is a rigid-flex PCB?
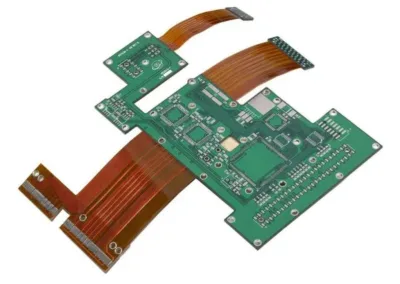
A rigid-flex PCB integrates rigid FR-4 sections and flexible polyimide sections into a single, permanently bonded structure. The rigid zones carry components and provide mechanical support; the flex zones bend, fold, or curve between them, carrying traces across the joints that a rigid design would bridge with a cable harness or board-to-board connectors.
A rigid-flex board is not a flex PCB glued to a rigid PCB. It is one board: the flex layers are laminated into the rigid stack-up and emerge from between the rigid layers in defined zones. That construction is what makes it reliable—and also what makes it unforgiving, because a failure in a flex zone cannot be repaired by swapping a cable.
When is a rigid-flex PCB actually worth it?
The single most useful question an engineer can ask is not “how do I design a rigid-flex PCB” but “does this design need to fold at all.” Rigid-flex is a premium product; forcing it into a design that would work as a static flex cable or a single connector is how budgets disappear.
The decision flips on three factors: whether the board must flex repeatedly in service, whether the enclosure is volume-constrained, and whether vibration is present.
| Your situation | Better choice | Why |
| Board bends once during assembly, then stays fixed | Static flex PCB, or rigid PCB + ribbon cable | Saves the rigid-flex tooling and lamination cost |
| Board flexes repeatedly in service (hinges, moving arms, wearables) | Rigid-flex with RA copper and correct bend ratio | Dynamic flexing is where rigid-flex earns its keep |
| Two rigid boards close together, no movement, space to spare | Two rigid PCBs + one connector | Cheaper, easier to rework, more suppliers |
| Tight 3D enclosure, no room for connectors or cable strain | Rigid-flex | Folds into the volume a flat board cannot reach |
| High-vibration environment (aerospace, automotive, industrial) | Rigid-flex over connectors | Connector contacts are the classic vibration failure point |
| High-frequency signals crossing the joint | Rigid-flex, or flex with controlled impedance | Connector interfaces add impedance discontinuities |
The framing that matters: rigid-flex eliminates connectors, and every connector you remove is a vibration-failure point, an impedance discontinuity, and an assembly step eliminated. But a poorly designed rigid-flex board—wrong bend radius, vias in the flex zone, ED copper in a dynamic area—can fail catastrophically with no repair path, because the flex section is permanently part of the assembly. It is not “automatically more reliable.” It is more reliable when the design rules are followed, which is a different statement. On a recent rigid-flex order at OrinewPCB, our DFM review found a design that placed plated vias 0.4mm from the bend line—inside the 1.0-1.5mm clearance the IPC-2223 family calls for—because the layout had been converted from a flat rigid board. That single flag saved a production run of boards that would have cracked conductors in the field within weeks of dynamic cycling.
Bend radius rules: the numbers that prevent conductor cracking
The bend area is the most mechanically stressed region of a rigid-flex board, and conductor cracking here is the dominant field-failure mode. The rule that governs it is the bend ratio: the minimum bend radius relative to the total flex-zone thickness—base polyimide film, copper, adhesive, and both coverlays included.
Published bend-radius guidance, by application (ranges reflect genuine source disagreement):
| Application | Bend ratio (radius : total flex thickness) |
| Static bend, single-layer flex (bent once during assembly) | 6:1 (commonly cited) |
| Static bend, multi-layer flex | 12:1 (commonly cited) |
| Dynamic bend (repeated flexing in service) | 10:1 to 100:1-150:1, depending on source |
The dynamic number is where credible industry sources disagree, and we are not going to paper over it. Many material suppliers publish a 10:1–20:1 rule of thumb for dynamic flexing, while conservative manufacturers implementing strict IPC-2223 standards recommend a far more cautious 100:1–150:1 ratio. The gap matters: a 0.2mm total flex-zone thickness bent to a 2mm radius (10x) is fine under the 10:1 rule and far too tight under conservative guidelines. The engineering answer is to design for the conservative end—the cost of a larger bend loop is small; the cost of a field failure is not—and to confirm the exact limits with your chosen fabricator before freezing the mechanical envelope.
📐 Engineering Note
Worked example: a dynamic flex zone with 1 oz (35µm) RA copper, 25µm polyimide on each side, two 25µm coverlays, and adhesive layers totaling roughly 0.15mm has a total flex thickness of about 0.30mm. The minimum dynamic bend radius is 0.30mm × 10 = 3mm under the common 10:1 rule of thumb, or 0.30mm × 100 = 30mm under the conservative IPC-2223-family guidance. If your mechanical envelope allows only 5mm, the design passes one reading of the guidance and fails the other—which is exactly why you confirm the number with your fabricator before committing tooling. If the conservative end is the one that applies, your options are: reduce flex thickness (thinner coverlay, lighter copper), accept a static-bend design (one-time assembly bend, 12:1 → 3.6mm), or change the mechanism.
Two more bend-zone rules that prevent cracking:
- Route traces parallel to the bend line.A trace running perpendicular to the bend line sees maximum tensile strain on the outer surface of the bend. Run critical signals along the bend axis, not across it.
- Keep copper weight low in flex zones.Button/pad plating or thinner copper in the flex area reduces the strain on the copper-dielectric interface. Specifying 1 oz in a dynamic flex zone when 0.5 oz would carry the current is a common, avoidable failure driver.
Design rules for the rigid-flex transition zone
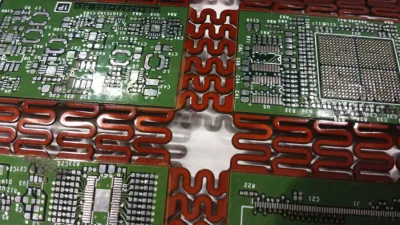
The transition—where rigid layers end and the flex zone emerges—is where delamination, conductor cracking, and adhesive failure originate. The rules here are specific, and violating them is the difference between a 10-year product and a 6-month warranty claim.
- Keep vias and plated through-holes 1.0-1.5mm clear of the transition line(IPC-2223-family design guidance). Vias are rigid stress concentrators; a plated barrel crossing the bend boundary is a crack-initiation site. This is the single most common DFM flag on rigid-flex orders we review.
- Taper the copper at the transition.Abrupt copper width changes concentrate strain. A gradual taper from rigid-zone width to flex-zone width spreads the bending stress over a longer length.
- Use large fillets, not 90° corners, where flex meets rigid.The coverlay-to-rigid boundary should be radiused to distribute peel forces.
- Specify no-flow prepreg at the boundary.Standard prepregs squeeze resin into the flex zone during lamination, stiffening it and blocking the intended bend. No-flow prepreg holds the boundary clean.
- No components in bend zones.SMT components on a dynamic flex area crack their own solder joints and concentrate stress at pad edges. Components belong on rigid zones or stiffened areas.
- Hatched ground planes in flex zones.A solid copper plane adds rigidity and thickness to the flex zone, raising the required bend radius. A cross-hatched (mesh) plane keeps the reference plane while preserving flexibility.
- Stiffeners where components mount on flex.FR-4 or polyimide stiffeners laminated under connector and component areas of the flex give solder joints a rigid foundation. A component on an unstiffened dynamic flex arm will crack its own joints—this is not a preference, it is a requirement.
⚠️ Important
Specify the transition-zone rules in your fabrication drawing, not just in an email. On a rigid-flex program at OrinewPCB, a customer’s original drawing specified standard prepreg across the whole panel; our DFM review flagged that resin would flow into the flex window during lamination and stiffen it past its specified bend radius. The fix—switching the boundary strip to no-flow prepreg—cost nothing before lamination and would have cost an entire panel if missed.
Materials: RA vs ED copper, polyimide vs LCP, coverlay vs solder mask
Material selection determines bend life, high-frequency performance, and cost. The three choices that matter most:
Copper foil: RA vs ED
The copper grain structure decides fatigue life, and the numbers are not subtle:
- Rolled annealed (RA) copperhas a lamellar, horizontal grain structure. Vendor-published elongation ranges sit at roughly 20-30% (some sources list up to 40%) before fracture, and it is the required choice for dynamic flexing.
- Electrodeposited (ED) copperhas a columnar grain structure, with elongation typically 5-10%. It is cheaper and fine for rigid zones or static flex (bent once), but in a dynamic flex zone it fatigue-cracks under repeated cycling.
Rule of thumb: dynamic flex zone = RA copper, no exceptions. (Elongation figures are vendor-published ranges from flex-circuit material suppliers, not an independently audited standard—treat them as directional for comparison purposes.)
Dielectric: polyimide vs LCP vs PET
- Polyimide (PI)is the industry standard flex substrate: excellent thermal stability, good mechanical properties, Dk roughly 3.4-3.6. It is the default and the correct default for most designs.
- Liquid Crystal Polymer (LCP)is chosen when the flex zone carries high-frequency signals: lower Dk (~2.9), very low moisture absorption, and better dimensional stability for controlled impedance. If your flex traces carry RF, LCP is the material to ask about.
- PET (polyester)is cheaper and lower-temperature—used in cost-sensitive, low-performance flex, not in rigid-flex boards that must survive reflow.
Coverlay vs solder mask
Flex zones use coverlay—a laminated polyimide film with adhesive—not liquid solder mask. Coverlay provides mechanical protection, bends without cracking, and anchors traces against the peel forces of repeated flexing. Liquid solder mask on a flex zone cracks under bending and is a common cheap-manufacturing shortcut to reject.
IPC-6013E classes: what Class 1/2/3 actually change
IPC-6013E qualifies rigid-flex and flexible boards into the three reliability classes defined by IPC-6011:
| Class | Typical products | What changes for your rigid-flex board |
| Class 1 | Consumer electronics, toys, disposables | Baseline requirements; cheapest path |
| Class 2 | Industrial, commercial, automotive (non-safety) | Standard performance; most rigid-flex production lands here |
| Class 3 | Medical implants, aerospace, military, life-support | Adds flex-cycle testing, stricter copper plating/coverage requirements, full documentation and traceability |
The class selection is not decoration—it changes what the fabricator tests, how much copper plating coverage is required in plated holes, the bend-cycle validation, and the documentation package. Class 3 rigid-flex typically carries a longer lead time and a meaningful cost uplift because of the added testing and process control.
Fabrication process: why rigid-flex takes multiple lamination cycles
Rigid-flex fabrication differs from rigid-board fabrication in one structural way: it requires multiple lamination cycles, because the flex layers are built first and the rigid layers are added around them in later cycles.
- Flex-core processing.Polyimide copper-clad laminate is imaged, etched, and coverlay-applied to create the flex layers.
- First lamination.Flex layers are bonded together (for multi-layer flex zones).
- Rigid buildup.Rigid outer layers and prepregs are laminated around the flex layers, with no-flow prepreg at the boundary.
- Controlled-depth routing.Rigid material is selectively routed away from the flex windows. This step is where precision matters most—cutting too deep damages the flex layers, and the accuracy of this cut defines the transition-zone quality.
- Drilling, plating, and imaging.Vias and through-holes are drilled and plated with parameters adjusted for the mixed-thickness construction.
- Surface finish and testing.Standard finishes (ENIG, HASL, OSP) apply to rigid zones; 100% continuity testing is strongly recommended because a rigid-flex failure is not reworkable by swapping a cable.
Each extra lamination cycle adds tooling, handling, and yield risk. This is the root of both the cost premium and the longer lead time, and it is why panelizing flex windows efficiently—the irregular shapes waste panel area—matters so much to the final price.
Rigid-flex cost: the 3-5x premium and when it pays back
Rigid-flex costs more than a comparable rigid board. The honest planning number is roughly 3-5x for equivalent surface area, with simple designs starting around 2x and high-reliability, high-layer-count builds reaching up to 8x—figures from fabricator cost-comparison material, so treat them as directional, not a quote.
The premium comes from four concrete drivers:
- Multiple lamination cycleswith no-flow prepregs and careful handling at each stage.
- Premium materials—polyimide film and RA copper cost more than FR-4 and standard ED copper.
- Panel utilization loss.Irregular flex-window outlines waste area on standard manufacturing panels; utilization can drop well below the 80-90% typical of rectangular rigid panels (directional estimate).
- Specialized processing and testing—controlled-depth routing, flex-cycle testing for Class 3, and the pre-baking and handling assembly requires.
Common rigid-flex failure modes
| Failure mode | Where it happens | Root cause | Design fix |
| Conductor cracking | Flex zone, at the bend or transition | Bend radius below ratio, perpendicular traces, ED copper in dynamic zone | Correct bend ratio, traces parallel to bend, RA copper |
| Via/barrel cracking | Transition zone | Vias inside the 1.0-1.5mm clearance band | Move vias onto rigid zones |
| Coverlay/adhesive delamination | Flex edges, bend areas | Poor adhesion, sharp geometry, moisture before reflow | Large fillets, pre-bake before assembly, radiused coverlay |
| Solder joint fracture | Components on flex | No stiffener under component, dynamic flexing | FR-4/polyimide stiffeners under all flex-mounted components |
| CAF growth | Plated holes in humid environments | Voltage bias + moisture along resin/fiber interfaces | Proper clearance, IPC-6013E class-appropriate materials |
| Resin squeeze-out stiffening flex | Flex window boundary | Standard prepreg instead of no-flow at boundary | No-flow prepreg at the transition |
📐 Engineering Note
The pre-bake rule deserves emphasis: polyimide absorbs moisture, and during reflow the flash-boiling moisture causes “popcorning”—delamination and internal blistering that shows up weeks later as intermittent failures. Rigid-flex boards should be pre-baked before assembly (directional vendor guidance: roughly 2-4 hours at 100-120°C, confirmed with your specific material supplier), and the assembly house must know the flex zones are present so reflow profiles are not over-spec’d for the thin sections.
Rigid-flex applications: where the technology is already standard
Rigid-flex is not an exotic niche; it is the standard construction in product categories where the mechanical envelope forces the decision:
- Wearables and consumer electronics:the Apple Watch and Samsung Galaxy Z Fold series both use rigid-flex/flex constructions to fold into volumes a flat PCB cannot reach.
- Medical devices:implantable pacemakers, cochlear implants, and hearing aids use rigid-flex for the combination of tiny volume and dynamic flexing. IPC-6013E Class 3 is the norm in this space.
- Aerospace and defense:avionics interconnects, phased-array radar, and satellite mechanisms use rigid-flex for weight and vibration resistance; rigid-flex and flex harnesses have been documented in NASA rover and military avionics programs.
- Automotive:camera modules and ADAS sensor assemblies use rigid-flex to route signals through compact, vibration-exposed spaces.
The thread across all of these is the same: movement, volume constraint, or vibration—the three conditions from the decision framework above. If your product has none of them, rigid-flex is probably the wrong tool; if it has all three, rigid-flex is probably the only tool.
How to choose a rigid-flex PCB manufacturer
Rigid-flex is a specialist process, and the selection bar is higher than for a standard rigid board. What separates a capable partner:
- Ask for rigid-flex-specific experience, not general PCB capability.A manufacturer that runs rigid-flex weekly handles controlled-depth routing, no-flow prepreg selection, and flex-zone panelization differently from one that does it annually. Ask how many rigid-flex programs they run per month.
- Confirm the standards are named, not generic.IPC-6013E class in writing, IPC-2223E design review, and IPC-A-610 for the assembly acceptance.
- Ask what their DFM review covers for flex.A meaningful review flags bend-ratio violations, vias in the transition band, missing stiffeners, and coverlay coverage before tooling—not after.
- Check the testing plan.100% continuity testing on rigid-flex is strongly recommended; Class 3 requires flex-cycle validation. Ask what is standard in the price.
OirnewPCB builds rigid-flex in-house with IPC-6013-based qualification, free DFM/DFA review on every order, and no minimum order quantity—so a single prototype gets the same engineering scrutiny as a production run.
Frequently Asked Questions
Q: What is a rigid-flex PCB?
A rigid-flex PCB is a single laminated board combining rigid FR-4 zones for component mounting with thin polyimide flex zones that bend and fold, replacing cables and board-to-board connectors between sections. It is governed by IPC-6013E (qualification) and IPC-2223E (design).
Q: What is the minimum bend radius for a rigid-flex PCB?
For static bends, commonly cited guidance is 6:1 (single-layer) to 12:1 (multi-layer) times the total flex-zone thickness. For dynamic flexing in service, published guidance ranges from roughly 10:1 (common fabricator rule of thumb) to 100:1-150:1 (conservative IPC-2223-family guidance as published by JLCPCB)—design for the conservative end and confirm the number your fabricator designs to.
Q: How much more does a rigid-flex PCB cost than a rigid PCB?
Roughly 3-5x for equivalent area, with simple designs from 2x and high-reliability builds up to 8x (directional industry estimates). The premium comes from multiple lamination cycles, polyimide/RA copper materials, panel utilization loss, and specialized routing and testing.
Q: When should I NOT use rigid-flex?
When the board is bent once and stays fixed (use a static flex cable or rigid + connector), when two rigid boards sit close together with space for a connector, and when there is no dynamic flexing, vibration, or volume constraint. Rigid-flex pays back only when it removes connectors, assembly steps, or enclosure volume.
Q: Why is rolled annealed copper required for dynamic flexing?
RA copper has a lamellar grain structure with roughly 20-30% elongation before fracture, versus 5-10% for electrodeposited copper (vendor-published ranges). Under repeated bending, ED copper’s columnar grains fatigue-crack; RA copper survives the cycles.
Q: What IPC standards apply to rigid-flex PCBs?
IPC-6013E covers qualification and performance of flexible and rigid-flex boards across Classes 1-3; IPC-2223E is the sectional design standard for flexible printed circuits. Name both, with the class, on your purchase order.
Conclusion
Rigid-flex PCBs solve a specific class of problems—foldable enclosures, dynamic flexing, vibration-exposed joints—and they solve them with a specific price tag: roughly 3-5x a comparable rigid board, paid back only when the design actually eliminates connectors, assembly steps, and enclosure volume. The technology rewards engineers who respect its rules: correct bend ratios (6:1 static to 150:1 dynamic, not a flat “10x”), vias kept 1.0-1.5mm clear of the transition, RA copper in dynamic zones, no-flow prepreg at the boundary, and stiffeners under every flex-mounted component.

Get Quote Free