VNC Raspberry Pi: Easy Headless Connection
For Raspberry Pi users looking to enhance device functionality without frequent physical interaction, enabling VNC is key to achieving remote graphical access. PCBAndAssembly PCBA service supports this type of technological exploration by providing professional board assembly solutions to ensure your Raspberry Pi functions as a core component of a stable, efficient electronic system. This service is particularly beneficial for robotics development, home automation, or any embedded system project lacking a dedicated display.
Get Your PCB Quote!

Table of Contents
1. Unlocking Headless Potential
The Raspberry Pi is an incredibly versatile mini-computer, capable of powering everything from home automation systems to robotics projects. Often, these projects don’t require a dedicated monitor, keyboard, or mouse – a setup known as “headless .” While accessing a headless Raspberry Pi via SSH (Secure Shell) for command-line control is common, sometimes you need a graphical user interface (GUI) to interact with applications, browse files, or simply visualize your project’s progress. This is where VNC (Virtual Network Computing) comes into play. Enabling VNC on your Raspberry Pi allows you to remotely access its desktop environment from another computer, giving you full graphical control as if you were sitting right in front of it. This guide will walk you through the entire process, from setting up your Raspberry Pi to establishing a secure VNC connection, making your headless Raspberry Pi projects more accessible and manageable than ever before.
2 . What is VNC and Why Use It for Raspberry Pi?
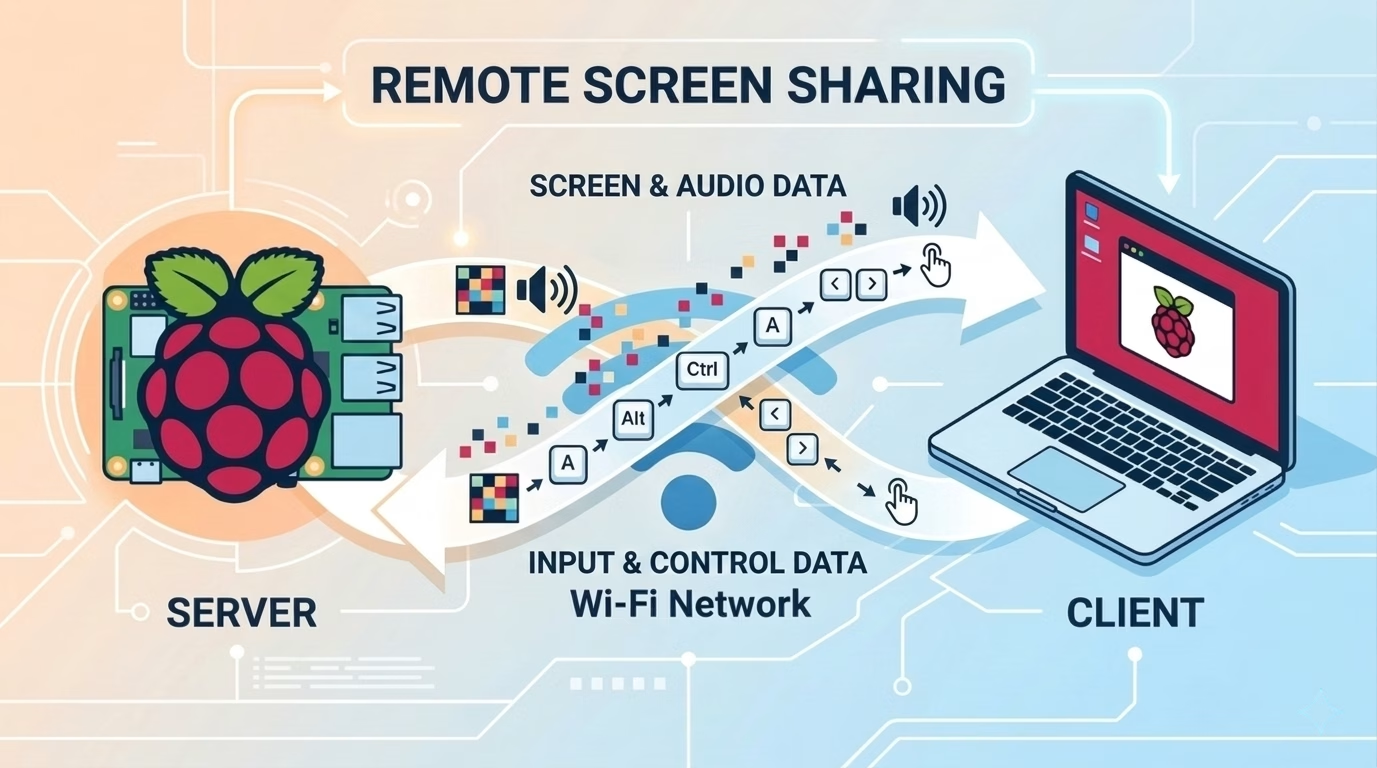
VNC is a graphical desktop sharing system that uses the Remote Frame Buffer (RFB) protocol to remotely control another computer. It transmits the screen updates from the remote machine to your local display and sends your mouse and keyboard inputs back, essentially extending the remote computer’s desktop to your local screen.
Why is VNC essential for a headless Raspberry Pi?
- Graphical Interface Access:Many applications, especially those developed for desktop environments, are much easier to use with a mouse and graphical display. VNC provides this convenience without needing physical peripherals.
- Simplified Troubleshooting:When something goes wrong, or you need to inspect log files in a GUI editor, VNC offers a familiar desktop environment that can speed up diagnosis.
- Remote Development:If you’re developing applications that have a visual component, VNC allows you to test and debug them directly on the Pi’s desktop from anywhere on your network.
- Resource Efficiency:You don’t need to dedicate a monitor, keyboard, and mouse to every Raspberry Pi, saving space and cost, especially in multi-Pi deployments.
- User-Friendly Setup:For those less comfortable with the command line, VNC offers a more intuitive way to manage your Pi once the initial setup is complete.
While SSH is excellent for command-line tasks, VNC complements it by providing that crucial graphical layer when you need it.
3. Prerequisites for VNC Setup
Before diving into the VNC setup, ensure you have the following:
- A Raspberry Pi:Any model with network capabilities (Wi-Fi or Ethernet) will work. Ensure it has a compatible operating system installed, preferably Raspberry Pi OS (formerly Raspbian) with a desktop environment (e.g., PIXEL). The “Lite” version of Raspberry Pi OS does not include a desktop by default, so you would need to install one manually (e.g., sudo apt install raspberrypi-ui-mods).
- Power Supply:A suitable power supply for your Raspberry Pi model.
- SD Card:An SD card (or SSD for Pi 4) with Raspberry Pi OS installed.
- Network Connection:Your Raspberry Pi needs to be connected to the same local network as the computer you’ll be using to access it (either via Ethernet cable or Wi-Fi).
- Another Computer:A desktop or laptop (Windows, macOS, Linux) from which you will connect to the Raspberry Pi. This computer will need a VNC client installed.
- SSH Access:For the initial configuration of VNC on your headless Pi, you’ll need to enable and use SSH. You can enable SSH either during the OS installation process or later via sudo raspi-config .
If you haven’t already, enable SSH on your Raspberry Pi. The easiest way is to place an empty file named ssh (no extension) into the boot partition of your SD card before first boot. Alternatively, after booting, you can run sudo raspi-config, navigate to “Interface Options,” and enable SSH.
4. Enabling VNC on Your Raspberry Pi
There are two primary ways to enable VNC: using raspi-config (recommended for simplicity) or manually installing and configuring a VNC server.
Depending on which version of Raspberry Pi OS you are running, the behavior of the VNC server may vary:
- For Legacy Systems (Bullseye & older):
Enabling VNC via raspi-config will activate RealVNC Server. This is fully compatible with the standard RealVNC Viewer client.
- For Modern Systems (Bookworm – Default for Pi 4 & 5):The new OS uses the Wayland display server by default. Enabling VNC now activates WayVNC.
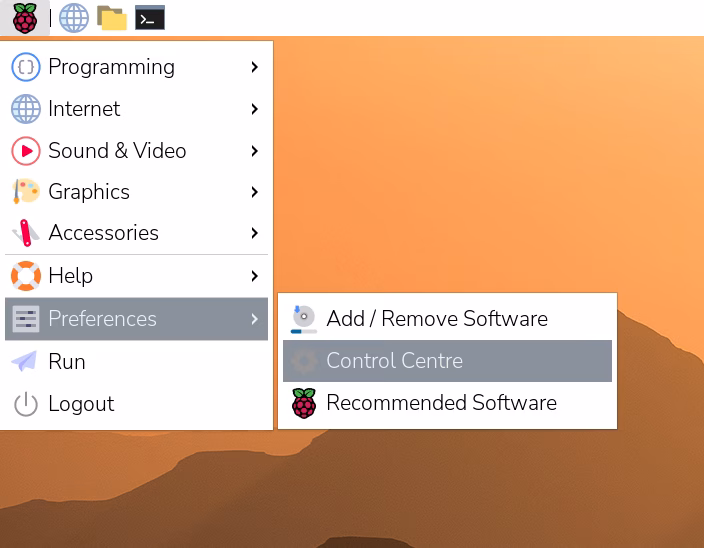
Method 1: Using raspi-config (Recommended)
This method utilizes the built-in configuration tool and is generally the quickest way if you have Raspberry Pi OS with desktop installed.
(Desktop)
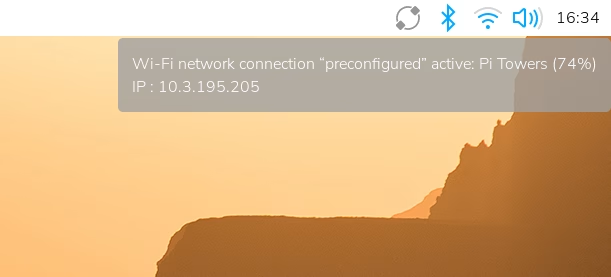
Hover over the network icon in the system tray, and a tooltip will appear. This tooltip displays the name of the network you’re currently connected to and your IP address.
- Connect via SSH:From your other computer, open a terminal (Linux/macOS) or PuTTY (Windows) and connect to your Raspberry Pi using its IP address or hostname. The default hostname is
raspberrypi
ssh pi@your_raspberry_pi_ip
Replace your_raspberry_pi_ip with your Pi’s actual IP address (e.g., 192.168.1.100). If you don’t know the IP, you can usually find it from your router’s administration page or by using tools like nmap on your network.
- Launch raspi-config:Once connected, run the command:
sudo raspi-config
- Navigate to Interface Options:Use the arrow keys to navigate to “3 Interface Options” and press Enter.
- Enable VNC:Select “I3 VNC” and press Enter. When prompted, select ” Yes” to enable the VNC server.
- Confirm and Exit:The system will install any necessary VNC packages (like RealVNC Server) and then confirm VNC is enabled. Select “Finish” to exit raspi-config. You might be prompted to reboot; it’s a good idea to do so to ensure all changes take effect. sudo reboot
After rebooting, the RealVNC Server will be running in the background, ready for
connections. Enable
Enable VNC Server Graphically
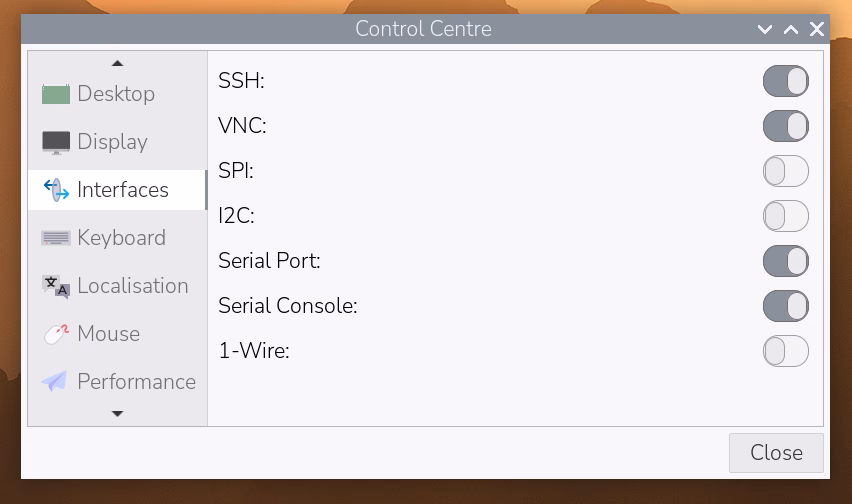
(Toggle the radio button next to VNC into the active position)
Method 2: Manual Installation (for specific VNC servers or headless OS)
If you prefer a different VNC server (like TightVNC Server) or are starting with Raspberry Pi OS Lite, you’ll need to install a desktop environment first and then a VNC server.
1. Update your system: Always start by updating your package list and upgrading installed packages.
sudo apt update
sudo apt upgrade -y
2. Install a Desktop Environment (if using Lite OS): If you’re on Raspberry Pi OS Lite, you need a desktop environment. A common lightweight option is LXDE (part of Raspberry Pi OS Desktop).
sudo apt install raspberrypi-ui-mods -y
This command installs the full Raspberry Pi Desktop environment. Alternatively, for a minimal desktop, you could install xserver-xorg, lxde-core, and lightdm.
3. Install a VNC Server (e.g., TightVNC Server):
sudo apt install tightvncserver -y
4. Start the VNC Server and Set a Password: vncserver
The first time you run vncserver, it will ask you to set a password for VNC connections (different from your SSH password). It will also ask for a view-only password (optional). Note the desktop number (e.g., :1) it assigns, as you’ll need it later.
5. Kill the Initial VNC Server Instance: The initial VNC server session might not be configured to run the full desktop. Kill it so you can configure it properly.
vncserver -kill :1
(Replace :1 with the desktop number from the previous step).
6. Configure VNC Server to Start Desktop: Edit the VNC server’s startup script to launch the full desktop environment.
nano ~/.vnc/xstartup
Comment out or delete existing lines and add the following at the end:
#!/bin/sh
xrdb $HOME/.Xresources
startlxde &
If you’re using a different desktop environment, replace startlxde with the appropriate command (e.g., startxfce4 for XFCE). Save and exit (Ctrl+X, Y, Enter).
7. Make the script executable:
chmod +x ~/.vnc/xstartup
8. Start VNC Server on Boot (Optional but Recommended):Create a systemd service to ensure TightVNC Server starts automatically on boot.
sudo nano /etc/systemd/system/
Paste the following content, replacing <USER> with your Raspberry Pi username (usually pi):
[Unit]
Description=TightVNC remote desktop service After=syslog.target network.target
[Service]
Type=forking
User=<USER>
PAMName=login
PIDFile=/home/<USER>/.vnc/%H:%i.pid
ExecStartPre=-/usr/bin/vncserver -kill :%i > /dev/null 2>&1
ExecStart=/usr/bin/vncserver -depth 24 -geometry 1280×800 :%i
ExecStop=/usr/bin/vncserver -kill :%i
[Install]
WantedBy=multi-user.target
Save and exit. Then enable and start the service:
sudo systemctl daemon-reload
sudo systemctl enable [email protected]
sudo systemctl start tightvncserver@1
This configures VNC to start on display :1 with a resolution of 1280×800 and 24-bit color depth. You can adjust the -geometry and -depth values as needed.
5. Connecting to Your Raspberry Pi with a VNC Client
With the VNC server now active on your Raspberry Pi, it’s time to connect from your computer.
TigerVNC (Recommended for New Systems): > If you are using the latest Raspberry Pi OS (Bookworm) on a Pi 4 or Pi 5, the default VNC server is WayVNC. Since RealVNC Viewer is currently incompatible with Wayland/WayVNC, we strongly recommend downloading TigerVNC Viewer. It is open-source, high-performance, and works seamlessly with the new system architecture.
Choosing a VNC Client
- RealVNC Viewer:If you used raspi-config, RealVNC Server is installed. RealVNC Viewer is the official client and offers the best compatibility and features, including encryption. It’s available for Windows, macOS, Linux, and mobile devices.
- TightVNC Viewer:If you installed TightVNC Server, the TightVNC Viewer is a good choice, also available across platforms.
- Other VNC Clients:Many other VNC clients exist (e.g., Remmina for Linux, built-in Screen Sharing for macOS). They should work with standard VNC servers, though features like encryption might vary.
Steps to Connect:
1.Install VNC Client: Download and install your chosen VNC client on your local computer . For RealVNC, go to RealVNC Viewer Download.
2.Open VNC Client: Launch the VNC client.
3.Enter Raspberry Pi’s Address:
- For RealVNC, you’ll typically enter the IP address of your Raspberry Pi, potentially followed by :5900 or simply the IP. RealVNC often handles the port automatically.
- For TightVNC or generic clients, you’ll enter the IP address followed by the display number. For example, if your Pi ‘s IP is 192.168.1.100 and the VNC server is on display :1, you’d enter 192.168.1.100:1 (which corresponds to port 5901).
4.Connect: Press Enter or click the “Connect” button.
5.Enter Password: The VNC client will prompt you for the VNC password you set earlier (not your Raspberry Pi user password, unless you configured it that way).
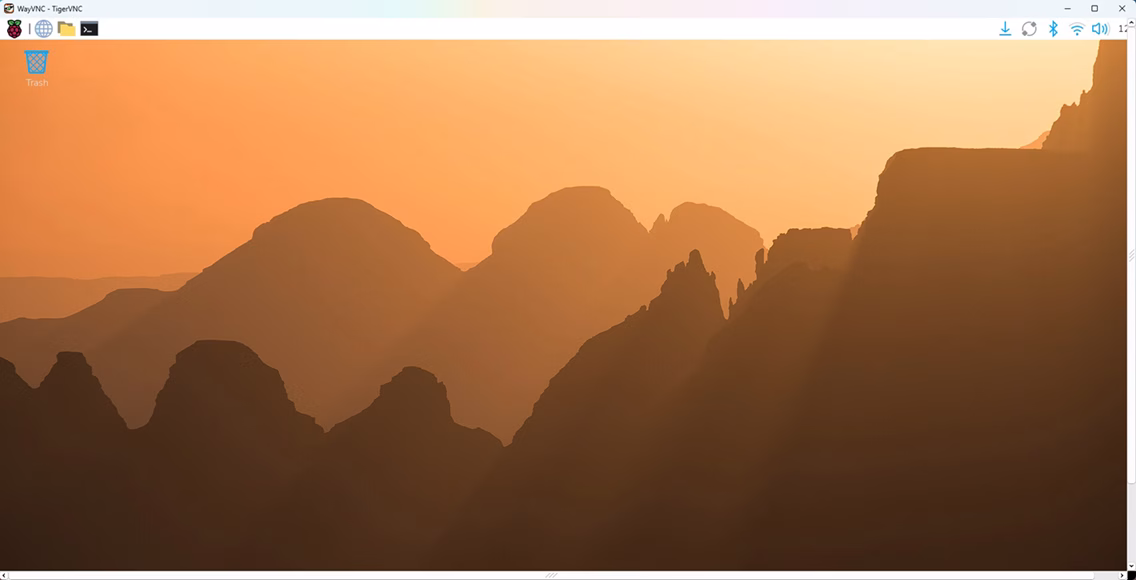
6.Access Desktop: Once authenticated, you should see your Raspberry Pi ‘s desktop environment appear in a window on your computer. You now have full graphical control!
6. Optimizing Your VNC Experience
To improve performance and usability, consider these tips :
Resolution and Color Depth
You can specify the VNC session’s resolution and color depth. Higher resolutions and color depths consume more bandwidth.
- For Legacy Systems (Bullseye & older / X11):* RealVNC: These settings are usually adjusted within the VNC Server options accessible from the desktop or through sudo raspi-config > Display Options > Resolution.
- TightVNC: You set these with the -geometry and -depth flags when starting the server (e.g., vncserver -geometry 1280×720 -depth 16 :1).
- For Modern Systems (Bookworm & newer / Wayland – Recommended for Pi 4/5):
- Wayland Resolution: In a headless setup, you must define a “virtual” resolution because there is no physical monitor to detect. Use sudo raspi-config> Display Options > VNC Resolution (or Headless Resolution) to set a fixed output (e.g., 1920×1080).
- Note: The older -geometry command will not work under Wayland. If you require the classic RealVNC behavior, you may need to switch the display backend from Wayland back to X11 via Advanced Options in raspi-config.
Compression and Encoding
Most VNC clients and servers allow you to adjust compression levels and encoding schemes. Experiment with these settings in your VNC client’s preferences. “Tight” encoding is often a good balance of speed and quality.
Network Speed
A fast and stable network connection is crucial. Wired Ethernet is almost always better than Wi-Fi for remote desktop streaming.
Disable Visual Effects
On the Raspberry Pi desktop, disabling unnecessary visual effects (e.g., fancy window transitions, transparency) can significantly reduce the amount of data transferred over VNC.
7. Security Considerations for Remote Access
Opening ports for remote access always introduces security risks. It’s vital to secure your VNC connection:
- Strong VNC Password:Use a complex, unique password for your VNC server.
- Keep Software Updated:Regularly update your Raspberry Pi OS and VNC server software to patch any security vulnerabilities.
sudo apt update && sudo apt full-upgrade -y
- Use SSH Tunneling (Recommended for External Access):If you need to access your Raspberry Pi from outside your local network, **do NOT directly expose VNC port 5901 (or any other VNC port) to the internet via port forwarding.** Instead, use SSH tunneling. This encrypts your VNC traffic within an SSH connection. To do this, on your client computer, set up an SSH tunnel :
ssh -L 5901:localhost:5901 pi@your_raspberry_pi_external_ip
Then, connect your VNC client to localhost:1 (or 127.0.0.1:1). The SSH tunnel will forward the traffic securely to your Pi. This requires your router to forward SSH port 2 2 to your Pi, which is generally more secure than forwarding VNC ports directly.
- Firewall:Consider enabling and configuring a firewall (like ufw) on your Raspberry Pi to restrict access to VNC and SSH ports only from trusted IP addresses.
8. Troubleshooting Common VNC Issues
If you encounter problems, here are some common issues and their solutions:
“Connection refused” or “Failed to connect”:
- Ensure the VNC server is running on the Raspberry Pi.
sudo systemctl status [email protected] (for TightVNC) or check RealVNC Server status.
- Double-check the IP address of your Raspberry Pi.
- Verify both devices are on the same network.
- Check for firewall rules blocking the VNC port (5900 + display number, e.g., 5901 for :1).
Blank screen or grey screen:
- This often means the VNC server started, but it’s not launching a desktop environment. Revisit your ~/.vnc/xstartup file if using TightVNC and ensure it correctly calls startlxde & (or your desktop environment’s command).
- Ensure you have a desktop environment installed on your Raspberry Pi.
- If using RealVNC, ensure your Pi’s display resolution settings are compatible or try restarting the VNC server.
Slow performance:
- Reduce the VNC session’s resolution and color depth.
- Ensure a strong and stable network connection. Use Ethernet if possible.
- Adjust compression/encoding settings in your VNC client.
- Close unnecessary applications on the Raspberry Pi.
VNC server not starting on boot:
- If using TightVNC, verify the systemd service file is correct and enabled:
sudo systemctl enable tightv [email protected]
sudo systemctl start tightvncserver@1
sudo systemctl status [email protected]
- For RealVNC, check its service status:
sudo systemctl status realvnc-vncserver.service
9. FAQ
Q:Do I need a screen connected to the Raspberry Pi to enable VNC?
A: No, that’s the whole point of a “headless” setup! You’ll use SSH to configure it initially without a screen.
Q:What is the default VNC port?
A: VNC typically uses port 5900 for the first display (:0), 5901 for the second display (:1), and so on. Most headless VNC setups use :1, meaning port 5901.
Q:Can I use VNC over the internet?
A: Yes, but it’s highly recommended to use an SSH tunnel for security reasons. Directly opening VNC ports to the internet is very risky.
Q:My VNC password doesn’t work. What should I do?
A: Ensure you’re using the VNC password you set when first running vncserver, not your Raspberry Pi user password. If you forgot it, you can reset it by running vncpasswd on the Pi.
Q:What’s the difference between RealVNC and TightVNC?
A: RealVNC is often pre-installed or easily enabled on Raspberry Pi OS via raspi-config, offering good integration and often more features (like cloud connectivity). TightVNC is a popular open-source alternative, often chosen for its simplicity and lighter footprint, especially when manually installing on minimal systems. Both achieve the goal of remote desktop access .
10. Summary
Enabling VNC on your Raspberry Pi is a game-changer for headless projects, providing the convenience of a graphical desktop interface without the need for physical peripherals. Whether you’ re configuring a home server, developing an embedded application, or managing a cluster of Pis, VNC simplifies interaction and troubleshooting. By following the steps outlined in this guide – from enabling VNC via raspi-config or manual installation to connecting with a VNC client and implementing crucial security measures – you can unlock the full potential of your headless Raspberry Pi setup, making remote management seamless and efficient.
If your Raspberry Pi project is growing beyond a breadboard, you’ll eventually need reliable PCBs to bring it to life. At PCBAndAssembly, we make it easy to go from prototype to production — whether you need bare PCBs or fully assembled PCBA boards. [Get a free quote →]

Get Quote Free